


“The defensive power of a pinned piece is but imaginary.”
– Aaron Nimzowitsch
The pin is the most common tactic in chess. We can find it in all phases of the game. This tactic happens when an attacked piece is immobilized (pinned) because if it moves, it will discover an attack upon another piece of greater value. If the piece behind the pinned piece is the King, we qualify the pin as being “absolute” and if it is another piece than the King, the pin is qualified as being “relative”. Also, only long range pieces (Queens, Rooks and Bishops) can pin other pieces. Let’s see together more details and some examples.
Table of Contents
What is the Absolute Pin
The absolute pin is more efficient than the relative pin, since it involves the King. Indeed, the pinned piece cannot move as it would reveal a check to the King which is not allowed (a player is forbidden to do a move that puts his own King in check). Here is an example of an absolute pin occurring after the opening moves 1.e4 e5 2. Nf3 Nc6 3. Nc3 d6 4. Bb5 :

As we can see, White’s last move places the Bishop from f1 to b5 to attack the Knight on c6. Although the Knight is protected by the b7 Pawn, Black can no longer rely on it, as the Knight is immobilised. If the Knight moves, the Bishop on b5 will deliver a check to the Black King, which occupies the same diagonal as the Bishop and the Knight. For now, the pin does not pose a significant threat, as the Knight and the Bishop are of equal value. However, we can say that the Bishop currently has the upper hand in this battle, although Black is not obliged to address the pin immediately. Black must remain vigilant, though, and consider the Knight’s immobilisation when planning their moves.
Now, let us examine a more striking example: a pin targeting a piece of greater value. In the diagram below, Black has just captured a piece in front of their King with their Queen. However, they clearly did not foresee White’s response: Re1!, which pins the Queen. This is an absolute pin, meaning the Black Queen cannot escape, forcing Black to exchange the Queen for the Rook. White emerges with a material advantage in this exchange.
Note that if White plays 1. Qe1 or 1. Qe2 instead, the Black Queen would still be pinned, but the pin would not be as effective. In that scenario, Black could simply exchange Queens, leaving White without a material gain from the pin.

What is the Relative Pin
A relative pin involves a piece other than the King. In this case, the pinned piece is allowed to move, as doing so does not result in an illegal move. Relative pins frequently occur in various opening lines. For example, consider the following sequence of moves: 1. e4 c6 2. Nc3 d5 3. Nf3 Bg4.

The Bishop on g4 pins the Knight on f3 because, if the Knight moves, Black can immediately capture the White Queen with Bxd1. This is referred to as a relative pin, as White can still choose to move the Knight despite the potential consequences, since doing so is not an illegal move.
When a piece is in a relative pin, it is important to remain vigilant about the potential moves it can make, as a surprising response might arise when least expected. Let us examine this idea in the following example. The position is reached after the moves: 1. e4 e5 2. Nf3 d6 3. Bc4 g6 4. Nc3 Bg4.
In this position, the Bishop on g4 is pinning the Knight on f3 to the White Queen. However, this pin is ineffective because White can respond with:
This example clearly illustrates the need for caution when dealing with a relative pin. As with a fork, the victim of a relative pin may have the opportunity to play an intermediate move to neutralise the pin’s effect. In fact, as shown in the following example, White uses an intermediate check to unpin a piece.
In the diagram below, the Bishop on b5 is pinning the Knight on c4 to the Rook on f1. To break the effect of the pin, White plays 1… Nxd6+.

with an intermediate check
Black is required to stop the check by moving his King on his next move, giving the chance to White to capture the Bishop or move his Rook on a safe square (on c1 for example…) to prevent being captured by the b5 Bishop.
Exploiting the power of the Pin
Now that we understand what a pin is, let us explore the maximum benefits we can derive from this tactic. As you become more familiar with it, you will begin to appreciate its potential and usefulness. A pin can provide a player with both permanent and temporary advantages over their opponent:
- A material gain
- The neutralisation of enemy pieces
- Winning tempi (development moves) over the opponent
Not bad for a single tactic! But now, how can we succeed in getting these advantages in our own games? Let’s see together some ways to capitalise on the pin with concrete examples.
The Material Gain
We know that a pinned piece cannot move without exposing a more valuable piece to attack. If a player threatens the pinned piece with another piece of lesser value, they can capture the pinned piece and win the exchange.
For example, in the following diagram, it is White to move, and Black’s Knight is pinned to the Queen by the White Rook on d1. The Bishop on g2 could capture the Knight, but Black would respond by taking the Bishop with the c6 Pawn, regaining the minor piece. Even so, White would come out ahead in the exchange by winning a Pawn after capturing on d5 with the Rook, once Black has taken the Bishop. However, this line is not the maximum White can achieve in this position. In fact, White has ample time to bring another piece to attack the pinned Knight, as the Knight is effectively immobilised.
Neutralisation of Enemy Pieces
This type of advantage is usually temporary and occurs when the pin is absolute. By pinning a piece to the King, we can successfully neutralise its action. Immobilising a piece in this way disrupts the attacking or defensive plans of our opponent.
In the diagram below, it is White to play, and White’s position appears unfavourable as they are down the exchange (a Bishop against a Rook) and both the Queen and the Bishop are under attack. While White could escape this double attack by moving the Queen to f2 or e1, thereby saving both pieces, this would give Black time to regroup, coordinate their pieces, and increase the attacking pressure.
However, White has a much stronger move available. By utilising an absolute pin, White can counter Black’s initiative. Can you spot it? The move is 1. Bc3!
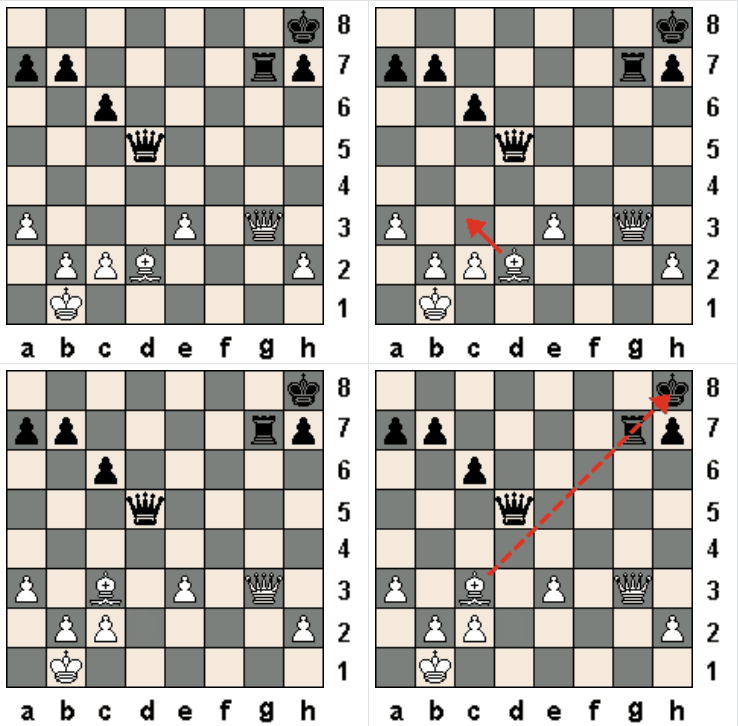
With this move, White leaves the Queen in the path of the Black Rook, but the Rook cannot capture its target — it is pinned to the King. Moreover, if Black does nothing to address the situation, White can win the game with 2. Qxg7#, turning the tables entirely. The hunter becomes the prey! Black is therefore forced to defend the g7 square adequately with either 1… Qf7 or 1… Qg8.
This pin is highly effective, as it neutralises two of Black’s most active pieces while turning a position that was favourable to Black into a winning position for White.
Winning Tempi
As we will see in the lesson on strategies, the concept of time is crucial in chess. Here, we are not referring to the time on the clock but rather to the number of moves a player uses to develop their pieces and coordinate their strategy. In chess terminology, this concept is known as a “tempo” (with “tempi” as the plural). Typically, a player who succeeds in gaining tempi over their opponent gains an advantage—provided they use those extra moves to develop their pieces effectively.
The pin is an excellent tool for winning tempi, as we will see in the following example.
In the diagram below, it is White to move. White is applying pressure on Black’s central d5 Pawn, with the Knight on b4 and the Rook on d3 both attacking it. However, the Pawn is well-defended, with the Rook on d8 and the Knight on c7 supporting it. It is critical for Black to maintain these two defenders; otherwise, they will lose the d5 Pawn.
White can take advantage of this situation by playing a move that develops one of their pieces while forcing Black to respond with a move that offers no benefit to their position. Pinning the Knight with 1. Bf4 achieves this goal.

Why does White gain a tempo with this move? If Black does not break the pin by moving the King out of the Bishop’s diagonal, the d5 Pawn will be left with only one defender, as the c7 Knight is immobilised by the absolute pin. This forces Black to play a move they did not intend, such as 1… Kc8. As a result, White successfully places the Bishop on a more active square, giving it a better role while simultaneously restricting their opponent’s options.
Final word
You might have found this lesson on the pin a bit long, but it was necessary to go into details, as this tactic is really important: it will bring a lot of new possibilities to your chess play. In my opinion, it is worth putting effort into mastering the pin and learning all its secrets. That’s why I encourage you to go through this lesson again and again until you master its content – you will see that it pays off!