


“Modern Chess is too much concerned with things like Pawn structure. Forget it, Checkmate ends the game”
Nigel Short
Ed.note: If you do not know what is a checkmate or if you need a refresh, I recommend that you go through the page introducing the checkmate before continuing.
The corridor checkmate pattern occurs when a Queen or a Rook checks the enemy King confined in a corridor. When the corridor is located on the back rank, it is called a back rank mate. As we already discussed in lesson 4 “The Basic Chess Rules”, the back rank mate is the most common checkmate. It is also the easiest one to spot, especially when a player has castled. In fact, the greatest threat against a castled king is the back rank mate.
Table of Contents
Simple Back Rank Mate
The back rank mate in its simplest configuration looks like this:

As we can see in the above diagram, the Rook on b8 is giving a check to the Black King which cannot be protected: the Pawns in front of the King are blocking all the possible exits.
Variations of the Back Rank Mate
Other patterns for this checkmate could also be achieved. To do so, we only need to replace the blocking effect of one of the Pawns (f7, g7 or h7) with another obstacle. This obstacle could be built from the action of an attacking piece, as shown in the below diagram:

We can note that the action of the Bishop on c3 obstructs the passage created by the advance of Black’s g Pawn.
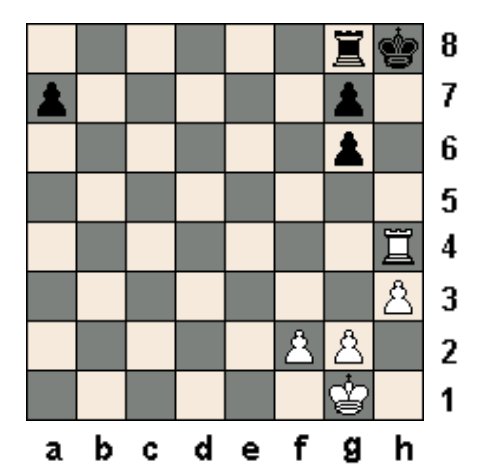
It is also possible to make the back rank checkmate on a column. As we can see in the following diagram, the White Rook on h4 is giving a checkmate to the Black King.
A Queen is more efficient in delivering a back rank checkmate since it can check the King and participate in the blockade at the same time. The Rook needs the participation of a friendly piece if the king has an exit square around. In the diagram below, we note that the White Queen on e8 gives a check to the Black King, but also blocks the f7 square to prevent it from escaping. If we replace the Queen with a Rook, black would not be checkmated.

Creative Uses of the Corridor Mate
Several possibilities can be derived from the corridor mate to help us checkmating a Lone King on the board. In the following diagrams, we can see a couple of examples:

When analysing the above diagrams, we can note that in the majority of the cases (diagrams 5, 6 and 8), the enemy King is confined on the side of the board. If the King is not occupying the side of the board, efforts must be made to create a corridor around the King as we can see in diagram 8.7.
Now that you understand the ideas behind the corridor mate, you can use your imagination to create your own version in your games!