


“In chess, as in life, a man is his own most dangerous opponent.”
Vasily Smyslov
Although the checkmate is the most efficient and artistic way to end a game, it does not happen often in high level games. The elite is more tactful and uses the checkmate in another way: they use it as a threat to obtain an advantage in the game. Indeed, it is sometimes possible to use a checkmating threat to improve our position or, alternatively, save material. To help you understand this concept, let’s analyse two positions together:
First Position – White To Move
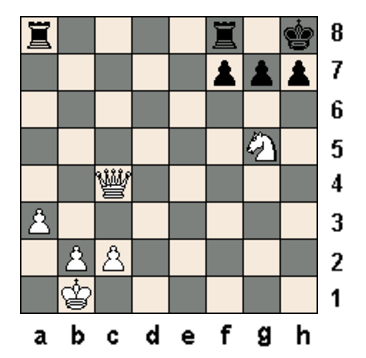
Does this position ring a bell? We saw something similar in this lesson. Don’t you think we have something that looks like the Philidor’s legacy position? Indeed, if the Black Rook on f8 was not protecting the Pawn on f7 (let’s say that it was sitting on the e8 square for example), White could checkmate Black in four moves with a smothered mate: 1. Nxf7+ Kg8 2. Nh6+ Kh8 3. Qg8+ Rxg8 4. Nf7#. It is not the case though. But what would happen if the knight capture the f7 pawn anyway? It is protected by the Rook but it does not have enough support since the White Queen is also attacking the Pawn. The Pawn is then lost. Black is winning at least a pawn in this position. But let’s try to analyse a bit deeper. Black must defend the check given by the Knight and to do so, they have two options:
- Move his King to g8 and try to limit their loss to only 1 pawn
- Capture the Knight with their Rook and loose the exchange.
To see these two options more clearly, let’s go through both variations:
Second Position – White To Move
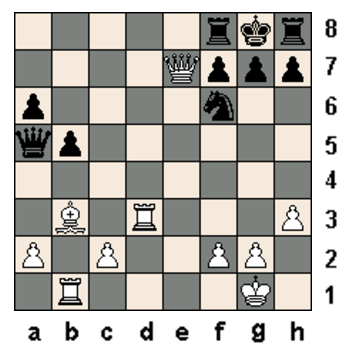
This position is much more complex. There is a material balance on the board, but the Black King seems to have some “breathing issues”. This situation could give Black major problems if White finds a checkmating threat and use it to get a material advantage.
If we take a good look at the position, the White Queen could capture the Black Knight on f6 if the g7 Pawn was not protecting it, but wait a minute, does the g7 Pawn is really supporting the Knight? What would happen if the pawn sits on f6 after taking the White Queen? Try to find the answer. Do it without a chessboard in order to develop your calculation and visualisation skills.
Did you see it? Do you need help? OK. Here is the moving sequence that might happen:
| 1. Qxf6! | gxf6?? |
| 2. Rg3# |
And Black is checkmated. The Queen is untouchable because of a corridor mate threat meaning that White can capture the Knight without any danger! But it does not stop here. Black, even if being a piece down, is still in the game since there is still a lot of material on the chessboard. White has other resources to increase its material advantage. See the game continuation below.
These two studies demonstrate nicely the potential of checkmate threats.